Pin
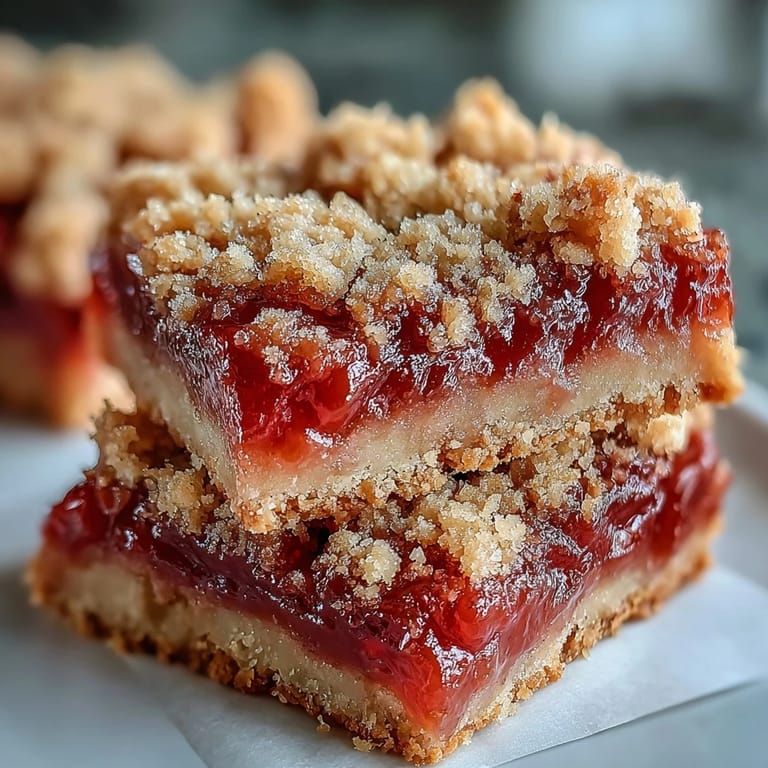
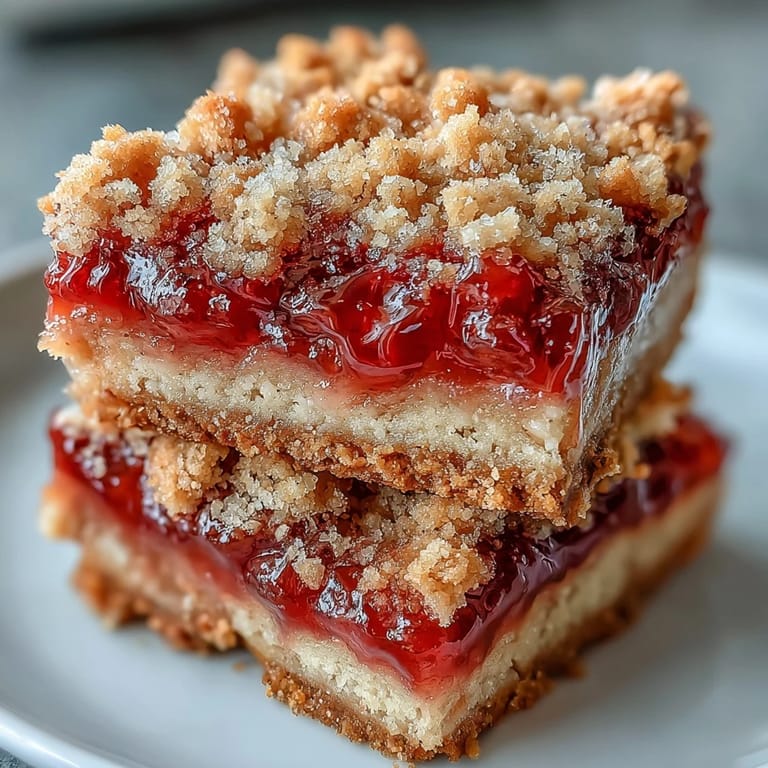
Pin My neighbor Maria handed me a jar of homemade guava jam one afternoon, insisting I do something special with it rather than just spreading it on toast. That evening, I found myself craving something between a cookie and a fruit dessert, and these bars were born from that exact moment of improvisation. The buttery base, jewel-toned jam filling, and crumbly topping came together so naturally that I've made them countless times since, always thinking of that generous gesture that sparked it all.
I brought a batch to a book club gathering on a warm summer evening, and watching everyone's faces light up when they bit into that tropical sweetness reminded me why I love baking for people. Someone asked for the recipe before they'd even finished their first bar, and that's when I knew these were keepers.
Ingredients
- All-purpose flour (2 cups): This is your structural backbone, keeping everything tender but sturdy enough to hold the jammy middle.
- Granulated sugar (1 cup): The sweetness here balances beautifully with the guava jam, so resist the urge to add more unless your jam is particularly tart.
- Baking powder (1/2 teaspoon): Just enough lift to make the bars feel airy rather than dense, but don't skip it or you'll end up with hockey pucks.
- Salt (1/4 teaspoon): This tiny pinch is a game-changer; it brings out the tropical flavors and deepens the overall taste.
- Unsalted butter (1 cup, cold and cubed): Cold butter is non-negotiable here—it creates those delicate crumbs that make these bars so irresistible, so cut it into pieces and pop it back in the fridge while you prep everything else.
- Large egg (1): This brings moisture and binds everything just enough without making the bars cake-like.
- Vanilla extract (1 teaspoon): A subtle background note that lets the guava shine without competing for attention.
- Guava jam or guava paste (1 cup): This is your star ingredient, so choose one you'd actually eat straight from the jar—quality really shows here.
Tired of Takeout? 🥡
Get 10 meals you can make faster than delivery arrives. Seriously.
One email. No spam. Unsubscribe anytime.
Instructions
- Set Your Stage:
- Preheat the oven to 350°F and line your 8x8-inch pan with parchment paper, making sure it drapes over the edges so you can lift everything out later without frustration. This small step saves you from the heartbreak of bars crumbling as you try to remove them.
- Make Your Dry Mix:
- Whisk together the flour, sugar, baking powder, and salt in a large bowl—this aerates everything and helps distribute the baking powder evenly. You'll notice the mixture smells sweet and wheaty, which is exactly what you want.
- Cut In the Butter:
- Add the cold, cubed butter and use either a pastry cutter, two forks, or your fingertips to blend until the mixture looks like coarse breadcrumbs. Work quickly so the butter stays cold; warm butter will make these greasy instead of delicate.
- Bring It Together:
- Stir in the egg and vanilla until a shaggy, crumbly dough forms—don't overmix or you'll toughen the final texture. It should look loose and craggy, almost like it might not hold together, but trust the process.
- Build the Base:
- Press about two-thirds of the dough firmly and evenly into your prepared pan, using the bottom of a measuring cup if your hands get sticky. You want an even layer, not gaps or thin spots, so take a moment to make sure it's uniform.
- Add the Jam:
- Gently spread the guava jam over the base with an offset spatula or the back of a spoon, leaving a small border so jam doesn't ooze out the sides during baking. If your jam is thick, it helps to warm it for just 10 seconds in the microwave so it spreads without tearing the base.
- Top It Off:
- Crumble the remaining dough evenly over the jam layer with your fingers, letting big and small pieces fall where they may—rustic is the whole point here. You want some chunky bits and some fine crumbs for textural contrast.
- Golden It Up:
- Bake for 35 to 40 minutes until the top is light golden and you can smell that buttery, jammy fragrance wafting from the oven. If the edges brown too quickly, tent with foil for the last 10 minutes.
- Cool and Slice:
- Let the bars cool completely in the pan—I know waiting is hard, but cutting them while warm will turn them into crumbles. Once cooled, use the parchment overhang to lift everything out, then cut into 16 neat squares.
 Pin
Pin There's something almost magical about watching someone's face when they realize these tropical bars are homemade, like you've just performed a small act of kitchen wizardry. That moment never gets old.
Choosing Your Jam Wisely
Not all guava jams are created equal, and the difference between a mediocre and spectacular batch of bars comes down to your filling choice. I've learned to read labels carefully—look for jams with guava listed as the first ingredient rather than sugar, and taste it before committing to a full batch. If you can only find guava paste, soften it slightly so it spreads without ripping the base. Tropical flavors can handle substitutions too; mango, passion fruit, or even pineapple jam work beautifully here if you want to experiment.
The Texture Game
What makes these bars special isn't just the ingredients—it's understanding how they work together to create that satisfying contrast. The crumbly base should be sturdy but tender, the jam layer provides pockets of sweetness and jammy moisture, and the streusel topping gives you that little crunch that keeps things interesting. If your bars turn out too cake-like, your dough probably got overworked or your oven ran cool. If they're too dry, you might have baked them too long or packed the base too tightly.
Make Them Your Own
These bars are a canvas for your own kitchen creativity, and some of my favorite variations came from what I happened to have on hand. I once stirred cardamom into the dough for a slightly spiced version, another time I mixed toasted coconut into the streusel and suddenly had a proper tropical moment. The base formula is so forgiving that you can play with it endlessly.
- For extra crunch and richness, fold 1/2 cup of chopped toasted pecans or macadamia nuts into the streusel before sprinkling it on.
- A pinch of cinnamon or cardamom stirred into the dry ingredients adds unexpected warmth without overpowering the guava.
- Serve these slightly warm with vanilla ice cream and watch them become an actual dessert moment instead of just a snack.
 Pin
Pin These bars remind me that some of the best kitchen discoveries come from improvisation and a generous neighbor's jam jar. Make a batch this week and see what moment they become part of for you.
Recipe Q&A
- → Can I use fresh guava instead of jam?
Fresh guava would need to be cooked down with sugar to create a jam-like consistency before using, as the moisture content in fresh fruit would make the bars soggy. Store-bought or homemade guava paste or jam works best for the proper texture.
- → How should I store these bars?
Store in an airtight container at room temperature for up to 3 days. For longer storage, refrigerate for up to a week. The bars can also be frozen for up to 3 months—wrap individual portions in plastic wrap and place in a freezer bag.
- → Why is my dough too soft or sticky?
The butter must be cold when incorporating it into the flour mixture. If your kitchen is warm, chill the bowl and ingredients briefly. The dough should hold together when pressed but remain crumbly—this texture is essential for both the base and streusel layers.
- → Can I make these bars gluten-free?
Yes, substitute the all-purpose flour with a 1:1 gluten-free flour blend that includes xanthan gum. The texture may be slightly more tender, but the bars will still hold together well. Ensure your guava jam is also certified gluten-free.
- → What other fruit fillings work well?
Apricot, raspberry, mango, or pineapple preserves all complement the buttery dough beautifully. The key is using a thick, spreadable fruit preserve rather than a thin jelly to prevent the bars from becoming soggy during baking.